Read, share, inspire

Read our latest interior design guides, tutorials, and how-tos.

Thank you! Your submission has been received!
Oops! Something went wrong while submitting the form.
Interior Designers
Designing Functional Zones in a Nail Salon
November 19, 2025
All Items

Designing Functional Zones in a Nail Salon

A nail salon can have beautiful interior finishes and still run chaotically if its functional zones aren't clearly separated. Clients don't know where to wait, technicians have to cross client walkways to grab supplies, and a pedicure area placed next to reception sends chemical odors straight to the front door. This isn't a decor problem - it's a zoning problem.

This guide breaks down every functional zone a nail salon needs, why placement affects daily operations directly, and how to lay them out according to the actual movement patterns of clients and staff.

Designing functional zones in a nail salon - a well-organized zoning plan

Why Zoning Matters More Than Surface Decor

A well-run nail salon needs at least six distinct functional zones: reception, waiting, manicure stations, pedicure, storage/backbar, and a staff area. Missing any one of these, or placing them in the wrong position relative to each other, creates operational friction that clients feel even when they can't name exactly what's wrong.

The practical effect: poorly placed zones force technicians to walk further between clients than necessary, clients end up waiting somewhere uncomfortable, and chemical odor from the pedicure or manicure zone drifts into the waiting area or reception. The application: design each zone around function and traffic flow first, then layer in materials and color.

Reception: The First Touchpoint That Shapes the Whole Visit

Reception should sit right near the entrance, with enough room to handle check-in for two or three clients at once without feeling cramped. This matters because it's where clients form their first impression and where payment happens — two functions that need different space and lighting than the service areas.

In practice, position the reception desk with a clear sightline to the waiting area and entrance, but avoid a direct line of sight into the pedicure zone so new clients aren't greeted with an active service in progress the moment they walk in. Retail display should sit near reception, not scattered around the salon.

Waiting Area: Separated From Active Service Zones

The ideal waiting area stays within the reception's sightline but separated by sound and smell from the manicure and pedicure zones. This matters because a client sitting within earshot of a drill or the smell of acetone forms a negative impression before being served, regardless of how good the actual service turns out to be.

For smaller salons, a light partition or a minimum 6-8 feet of distance between the waiting area and the nearest service station makes a noticeable difference. Layout strategies for constrained spaces are covered in small nail salon design in the US.
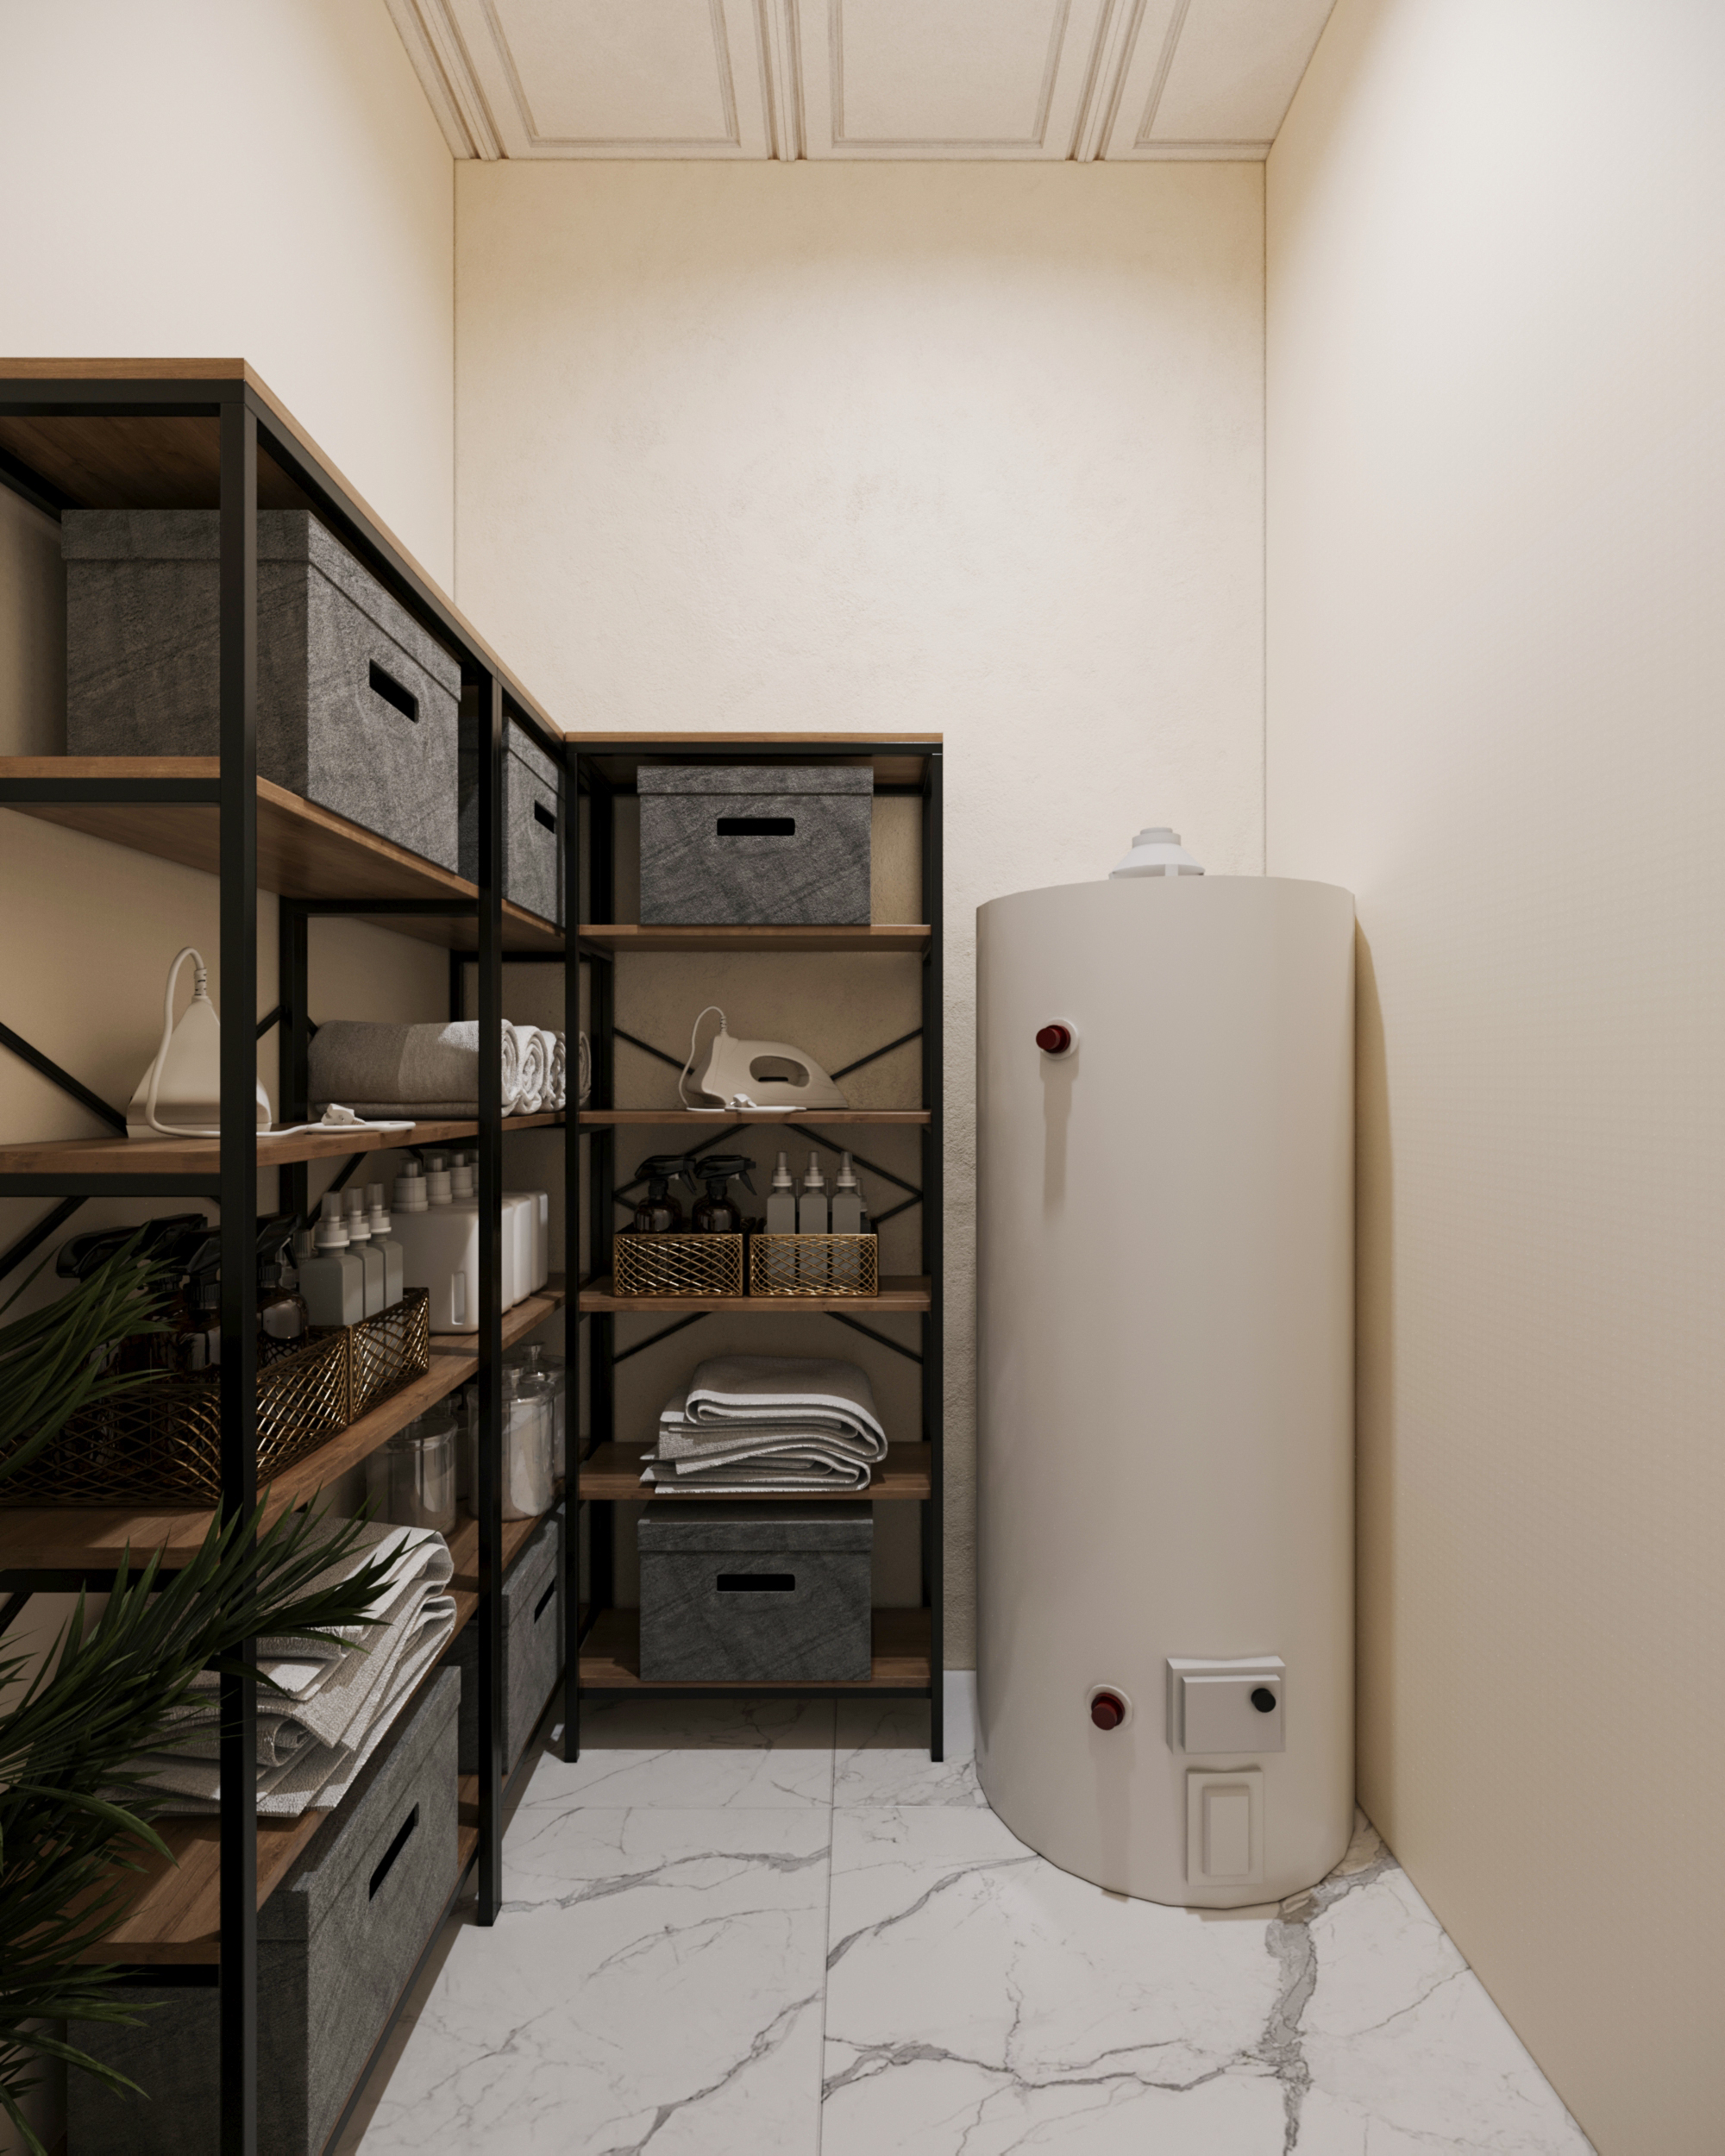
Waiting area placement in nail salon functional zone design

Manicure Zone: Station Spacing and Supply Flow

Manicure tables should be arranged in rows or clusters with a minimum of 3 to 3.5 feet between chairs, giving technicians and clients room to move comfortably while keeping enough separation that clients don't feel observed by the neighboring station. Spacing too tight feels cramped and lowers the experience; spacing too wide wastes floor space that could hold another station.

Consumable supplies need a restock point close to the manicure zone, not on the other side of the waiting area or pedicure zone. This small detail directly affects how many clients a technician can serve in a day.

Pedicure Zone: Furthest From Reception, With Its Own Plumbing

The pedicure zone should sit as far from reception and the waiting area as the floor plan allows, since it generates the most chemical odor and noise in the salon. This matters because pedicure stations also require dedicated water supply and drainage, meaning placement directly affects plumbing installation cost.

In practice, lock in the pedicure zone's location during the initial floor plan stage, not after every other zone is already fixed - it's the hardest zone to relocate once plumbing is installed. A 3D rendering before construction lets you verify this placement makes sense before committing to plumbing work - see nail salon 3D design service.

Storage and Backbar: Invisible to Clients, Critical to Smooth Operations

Storage and backbar space is often overlooked during planning because clients never see it, but it determines whether technicians have to leave the service floor to find supplies. This matters because without backbar space close enough, technicians end up stockpiling product at their own station, creating a cluttered, unprofessional look in front of clients.

In practice, cluster backbar storage near its corresponding station type - manicure backbar near manicure stations - rather than relying on one central storage room if the floor plan allows splitting it up.

Staff Area: A Break Space for Long Shifts

A small area for staff to eat, rest between clients, or store personal items is a practical requirement that's usually the first thing cut when budget gets tight. This matters because technicians working 8 to 10 hour shifts without a proper break space burn out faster, which affects service quality and staff turnover.

Even a small salon should carve out a minimum corner for this, kept out of client sightlines. Planning every functional zone from the start avoids a costly renovation later - see complete nail salon interior package.

Traffic Flow Principles Between Zones

The ideal traffic flow moves in one direction: clients enter through reception, move to the waiting area, then to a service station, and exit back through reception to pay. Staff should have a separate path between the service floor and the backbar/staff area that doesn't cross the client path repeatedly.

This matters because when these two paths cross constantly, the salon feels disorganized even if each individual zone was designed beautifully. In practice, sketch both the client and staff traffic flow before finalizing zone placement — not just the furniture layout.

FAQ

How many functional zones does a nail salon need at minimum?

At least six: reception, waiting, manicure stations, pedicure, storage/backbar, and a staff area. Missing any one of these forces zones to share space, creating operational friction regardless of how attractive the overall interior looks.

Which zone should be positioned first when planning a layout?

The pedicure zone should be locked in first, since it requires dedicated water supply and drainage and is the hardest zone to relocate after construction. Every other zone can be arranged more flexibly around the pedicure zone's fixed position.

Can a small nail salon still have all the necessary functional zones?

Yes, by using light partitions or ceiling height changes instead of fixed walls to divide zones, and clustering backbar storage in small groups near each station type rather than one large central storage room. Limited square footage restricts the size of each zone but doesn't restrict whether the salon has all the necessary functions.

Should I hire a specialized designer for nail salon zoning?

Yes - zoning mistakes made at the floor plan stage lead to expensive fixes once plumbing and electrical systems are already installed. A designer who understands the nail industry accounts for traffic flow and utility placement from the earliest planning stage.

Does chemical odor from the pedicure zone affect how other zones should be arranged?

Yes, this is the main reason the pedicure zone needs distance from reception and the waiting area, combined with ventilation sized appropriately for each zone rather than one shared system for the whole salon.

Conclusion

Three things matter most when designing functional zones in a nail salon: lock in the pedicure zone's location first since it's the hardest to relocate, keep the waiting area separated from service zones by sound and smell, and map both client and staff traffic flow before finalizing the interior layout.

If you're planning the zoning for your own nail salon, Spencil can provide a preliminary consultation based on your square footage and service model.

📞 888-995-0058

📍 535 Mission St, San Francisco, CA 94105

🌐 spencil.co

📩 facebook.com/spencilco
Interior Designers
Nail Salon Interior Build-Out in the US: Costs and Process
November 6, 2025
All Items

Nail Salon Interior Build-Out in the US: Costs and Process

Most nail salon build-out projects don't go over budget because of materials or furniture. They go over budget because of what was left out or not fully understood from the start: a ventilation system that doesn't meet OSHA standards, permits that need to be re-filed, or a finished build-out that fails inspection because certain areas don't meet local building code.

This guide covers the full picture: what a turnkey nail salon interior build-out in the US includes, how the process works step by step, what costs look like at different scales, and what legal requirements you need to know before you start.

Nail salon interior build-out in the US - early construction phase showing mechanical and electrical rough-in

1. What a Turnkey Build-Out Includes

"Turnkey" in nail salon construction can mean very different things depending on the contractor. Before signing any contract, confirm exactly what's in scope.

A complete, standard-scope build-out typically includes:

Mechanical and technical systems: Electrical (outlets at nail stations, lighting, equipment circuits), plumbing (pedicure area, shampoo bowls), dedicated HVAC and ventilation for the nail salon environment.

Space finishes: Paint, flooring, drywall ceiling or ceiling tiles, interior doors, and any partitions.

Built-in furniture: Reception counter, nail stations, pedicure chairs (installed and plumbed), waiting area seating.

Lighting: Ambient lighting, task lighting at nail stations, accent lighting per the design concept.

Signage and branding: Logo wall, exterior or window signage per the design drawings.

Permits and inspections: Filing for building permits, coordinating with inspectors, and achieving Certificate of Occupancy (CO).

Items commonly excluded from lower-priced packages: code-compliant OSHA ventilation, permit filing fees, corrections after failed inspections, and post-construction cleanup.

2. The 7-Step Nail Salon Build-Out Process

Step 1: Design and construction drawings (2–3 weeks)

Before anything is built, you need approved technical drawings. These are not 3D concept visuals - they are construction documents: floor plan, electrical plan, plumbing plan, and mechanical plan (HVAC). Skipping or rushing this step is the single most common reason nail salon projects require costly teardowns and rework.

Step 2: Permit filing and approval (1–4 weeks, varies by county and state)

Any work involving electrical, plumbing, or structural changes requires a building permit. Processing times vary significantly - some counties in California take 3–4 weeks, while parts of Texas and Georgia often move faster.

Building without a permit is a serious legal risk. If discovered, you may be required to demo everything and rebuild, at your own cost.

Step 3: Rough-in construction (1–2 weeks)

Framing (if the layout is changing), electrical rough-in, plumbing rough-in, and ductwork for the ventilation system. This is the work that isn't visible in the finished space but determines the quality and durability of everything above it.

Step 4: Rough inspection

After rough-in but before walls are closed, the city or county inspector checks the electrical, plumbing, and ventilation systems. If the inspection fails, corrections must be made before construction can continue.

Step 5: Space finishes (2–3 weeks)

Drywall, paint, flooring, ceiling work, doors, and all interior finish work. This is the most visible phase and typically the most time-consuming part of the full project.

Step 6: Furniture and fixture installation (1–2 weeks)

Installing nail stations, pedicure chairs (plumbed), reception counter, lighting fixtures, signage, and all remaining equipment.

Step 7: Final inspection and Certificate of Occupancy

The final inspection that allows you to legally operate the business at that location. Without a CO, you cannot open - regardless of how finished the space looks.

Nail salon build-out process — furniture installation phase with nail stations and reception counter
Nail salon build-out process - furniture installation phase with nail stations and reception counter

3. Real Nail Salon Construction Costs in the US

Construction costs depend on square footage, state, finish level, and the starting condition of the space (shell space vs. second-generation).

By salon size:

Real Nail Salon Construction Costs in the US
Cost of constructing a nail salon in the US varies depending on the size of the salon

Shell space (no existing electrical, plumbing, or HVAC) typically runs 20–40% higher than second-generation space with basic systems already in place.

Largest budget items:

 The items that take up the largest budget in nail salon construction
The items that take up the largest budget in nail salon construction

The three most common reasons projects go over budget:

First, incomplete drawings that lead to change orders during construction. Second, discovering existing damage or non-compliance issues once walls are opened. Third, a ventilation system that needs to be rebuilt because it doesn't meet OSHA or state-specific standards at inspection time.

See the full scope of what a complete interior package covers in nail salon interior turnkey package.

4. Legal Requirements: Building Code, HVAC, and Ventilation

Nail salons face stricter legal requirements than standard retail spaces because of the chemical environment. This is the area contractors without nail salon experience most often get wrong.

Ventilation - The Most Critical Requirement

OSHA sets standards for ventilation in workplaces with chemical exposure. For nail salons, that means:

A dedicated exhaust system at the nail station area - the building's shared HVAC cannot substitute for this. Minimum airflow at workstations: many states require 20–50 cfm per nail station. Source capture ventilation (suction directly at the table surface) is increasingly required or strongly recommended by state regulations.

California, New York, and Washington have the most specific requirements. Texas and Georgia generally follow base OSHA standards but may also have county-level requirements that go further.

Building Permits - What Always Requires a Permit

- Any changes to electrical wiring (adding outlets, upgrading the panel)

- Any changes to or additions of plumbing

- Installing or modifying HVAC systems

- Structural wall changes (demolition, adding partitions)

- Any work affecting the fire suppression system (sprinklers)

ADA Compliance

New construction and renovations must meet ADA (Americans with Disabilities Act) requirements for accessible entry, interior clearances, and restroom facilities. An experienced commercial contractor will incorporate these into the drawings from the start, preventing them from surfacing as add-ons after inspection.

5. Construction Timeline and Planning Your Opening

A complete nail salon build-out from start to CO typically takes 8–14 weeks for a mid-size salon when no major permit or inspection issues arise.

Realistic project timeline:

Construction time for a complete nail salon project in the USA
Estimated time for a complete nail salon construction projec

The most common planning mistake: signing a lease with a fixed opening date before a permit has been approved. If permitting runs long or an inspection fails, rent is still due while the salon generates no revenue.

Practical recommendation: set your target opening date at least 16 weeks from the day you sign the construction contract. That's two weeks of buffer beyond the best-case timeline — which reflects actual project outcomes more accurately than an optimistic schedule.

6. Building From a 3D Design vs. Without One

Building from a detailed 3D design is not a luxury option. Over the full life of a project, it typically costs less than building without one.

Without a 3D design:

The contractor interprets the design based on their understanding, which may not match the owner's intent. Changes mid-construction generate change orders. There's no way to verify the outcome before construction commits to it.

With a 3D design:

You review the actual result - colors, materials, layout, lighting - before any work begins. Construction drawings are exported directly from the 3D model, reducing discrepancy between drawings and execution. Change orders after a design has been approved rarely happen.

On a $60,000–$120,000 project, 3D design typically costs 3–5% of the total budget and frequently avoids the 10–20% in overruns that trace back to mid-construction changes. See the full process in nail salon 3D design service.

FAQ

How long does it take to build out a nail salon in the US?

Average 8–14 weeks from approved drawings to Certificate of Occupancy for a 1,200–2,000 sqft salon. Add 2–3 weeks for design if drawings don't exist yet. Permitting is the variable outside your control — some counties process in a week, others take 3–4 weeks.

Do you need a permit to build out a nail salon?

Yes, for essentially all structural work: electrical, plumbing, HVAC, and any changes to walls. Permits are a legal requirement, not optional. Building without permits can result in a stop-work order and a requirement to demo and redo everything at your cost.

How much does a nail salon build-out cost in the US?

Roughly $40,000–$80,000 for a small salon (800–1,200 sqft) and $80,000–$130,000 for mid-size (1,200–2,000 sqft), in second-generation space. Shell space runs 20–40% higher. HVAC and ventilation is consistently the most under-budgeted line item in initial quotes.

Can a general contractor build out a nail salon?

Technically yes. But contractors without nail salon experience typically don't understand the specific ventilation requirements, aren't familiar with OSHA standards for chemical work environments, and don't know the plumbing and drainage requirements for pedicure chair installation. These gaps usually surface at inspection.

How is remodeling an existing salon different from a new build-out?

Remodels are more complex logistically: construction happens while the space may still need to operate in part, and you can't cut power or demo walls at will. Costs typically run 15–25% higher than a comparable new build for the same scope. See nail salon remodel in the US for a detailed comparison.

How do I know if a contractor has nail salon experience?

Three questions to ask directly: (1) How many nail salons have you built in the US? (2) How do you handle permitting and inspections in your process? (3) Can you provide references from nail salon owners whose projects you completed? A contractor with real experience answers all three without hesitation.

Conclusion

Three things most salon owners don't know until after they've signed a contract:

First, the real cost of a nail salon build-out isn't in materials or furniture - it's in the technical items that get left out: code-compliant ventilation, complete permitting, and a realistic buffer for inspections that don't pass the first time.

Second, the 8–14 week timeline only holds when everything goes smoothly. Signing a lease with a hard opening date before a permit is in hand is an unnecessary financial risk with a straightforward fix.

Third, 3D design before construction doesn't make a project more expensive - it makes the project less likely to run over budget, by removing most of the conditions that create change orders.

If you're planning a nail salon build-out in the US and want to move from design through to completed construction with one team, Spencil handles the full process.

📞 888-995-0058

📍 535 Mission St, San Francisco, CA 94105

🌐 spencil.co

📩 facebook.com/spencilco

Interior Designers
Salon
Spa
Top 7 Mẫu Nội Thất Cho Salon Hot Nhất Năm 2025
November 3, 2025
All Items

Đối với các chủ tiệm nail tại Mỹ, việc lựa chọn nội thất cho salon không chỉ giúp cửa tiệm trông sang trọng hơn mà còn ảnh hưởng đến trải nghiệm khách hàng. Cùng khám phá 7 mẫu nội thất salon được chuyên gia khuyên dùng nhất năm 2025.

1. Ghế nail massage – nội thất cho salon cao cấp

Ghế da PU tích hợp massage tự động, điều khiển cảm ứng, giúp khách thư giãn tối đa. Mẫu ghế của Belava hay Lexor được nhiều salon cao cấp ở California ưa chuộng.

Ghế nail massage hiện đại – nội thất cho salon cao cấp giúp khách thư giãn

2. Quầy lễ tân hiện đại – nội thất cho salon chuyên nghiệp

Thiết kế từ acrylic hoặc gỗ sơn bóng, tông trắng hoặc nâu sáng giúp không gian nổi bật và dễ vệ sinh.

3. Gương tròn viền LED – điểm nhấn nội thất cho salon

Không chỉ soi gương, mà còn là góc check-in chuẩn luxury. Ánh sáng LED giúp tăng độ sáng và mở rộng không gian thị giác.

4. Bàn làm nail tiện ích – nội thất cho salon hiện đại

Tích hợp ngăn hút bụi âm, mặt kính cường lực, phù hợp các tiệm nail chú trọng vệ sinh và tính thẩm mỹ.

Nội thất cho salon bàn làm nail thông minh

5. Ghế chờ bọc da tông nude – xu hướng nội thất cho salon Mỹ

Gam màu pastel và nude nhẹ nhàng đang dẫn đầu xu hướng decor tại Los Angeles và New York – vừa tinh tế, vừa dễ phối màu.

6. Đèn treo nghệ thuật – ánh sáng hoàn hảo cho nội thất salon

Đèn thả ánh vàng hoặc kiểu Bắc Âu giúp tạo bầu không khí ấm áp, thư giãn và nổi bật thiết kế không gian.

Đèn thả điểm nhấn nội thất cho salon chuyên nghiệp

7. Kệ trưng bày gỗ tự nhiên

Kệ gỗ sáng màu, bố trí khoa học giúp sản phẩm nail trở nên nổi bật hơn, đồng thời thể hiện gu thẩm mỹ chuyên nghiệp.

Lời khuyên từ chuyên gia thiết kế nội thất cho salon

“Một salon đẹp không cần quá nhiều chi tiết, chỉ cần mọi thứ đồng bộ và phản ánh đúng thương hiệu của bạn.”
- Quan Nguyen, chuyên gia thiết kế salon tại Spencil.

Xem thêm:

👉 Cách bố trí nội thất salon nhỏ giúp tối ưu không gian

Kết luận:

Đầu tư đúng nội thất cho salon là đầu tư vào thương hiệu. Dù là salon lớn hay nhỏ, chỉ cần chọn đúng nội thất cho salon phù hợp, bạn đã có thể biến không gian thành nơi khách hàng muốn quay lại mỗi tuần.


Interior Designers
How to Set Up a Nail Salon in the US: A 7-Step Guide
October 30, 2025
All Items

How to Set Up a Nail Salon in the US: A 7-Step Guide

Setting up a nail salon in the US is more than picking paint colors and a pedicure chair you like. It's a sequence of decisions that depend on each other: which space to lease, which permits to file first, when design should start, and when equipment needs to be ordered so opening day doesn't slip.

This guide isn't another cost breakdown or design trend roundup. It answers a more specific question: in what order, and how long each step actually takes, to go from an empty space to a finished salon ready for clients.

How to set up a nail salon in the US - 7 steps from lease to opening day

1. Define Your Salon Model and Total Budget

Before touring spaces, answer three questions: what client segment the salon will serve, what square footage it needs, and what the total budget actually is. These three answers shape every step that follows, from the type of space to look for to how much to invest in design.

A boutique salon at 500–700 sqft needs a stronger location and more detailed design than an express salon serving walk-in traffic. A family-style salon at 1,000+ sqft needs more stations but can work in a residential-area location instead of a prime retail corridor.

On budget, have a total figure and a rough allocation across categories before moving to the next step. Capital requirements by salon size are broken down in how much capital to open a nail salon in the US

2. Find a Space and Sign the Lease

The right space needs to check three boxes at once: foot traffic, square footage that matches the model from step 1, and infrastructure that fits your renovation budget.

A space that was previously a nail salon or spa usually already has basic plumbing and ventilation, cutting renovation cost and time compared to raw shell space. Before signing, check whether the electrical load can handle nail equipment, whether plumbing can reach the planned pedicure chair layout, and whether existing ventilation meets health department requirements.

When negotiating the lease, three terms matter most: the free rent period during construction, who's responsible for restoring the space at lease end, and any restrictions on the type of renovation allowed. Have a real estate attorney review the lease before signing, especially for a 5–10 year term.

3. Complete Permits and Legal Requirements

Nail salon permits in the US are issued at the state level, not federally, so requirements vary by state and county. Common permits include a business license, cosmetology/nail salon license, health department permit, and building permit for the renovation.

Processing typically takes 4–12 weeks depending on the state, with California, New York, and other major cities running more complex, stricter reviews. File permits in parallel with the design phase in step 4, rather than waiting until design is finished, to shorten the overall setup timeline.

Insurance should also be finalized in this step. General liability and workers' compensation are required in nearly every state, and most landlords require proof of insurance before allowing construction to begin.

4. Design the Salon Space

This is the step that determines whether the salon is actually beautiful in a way that attracts clients, not just beautiful on paper. Design should start as soon as the space is secured, running parallel to the permit process so it doesn't add extra time to the overall schedule.

A 3D rendering before construction shows station layout, lighting, and overall style, avoiding costly changes after materials are already in place. The three most popular styles in the US right now are Korean minimalist, luxury, and soft aesthetic -see nail salon design ideas for the US market for a breakdown of each and what actually drives client appeal. For smaller spaces, layout strategy is covered separately in small nail salon design in the US.

For owners without experience reading technical drawings, a dedicated 3D nail salon design service makes it possible to see the exact space before signing a construction contract.

Ordering equipment and construction during a nail salon setup in the US

6. Hire Staff and Prepare Operations

Hiring should start 4–6 weeks before your target opening date, not after construction wraps up. Skilled nail technicians often already have a client base at their current salon and need time to arrange the move, plus time for training on your specific procedures.

Alongside hiring, finalize your booking and POS system, sanitation procedures required by the health department, and the initial round of consumable supplies for the first 60–90 days. Order supplies at least 2 weeks before opening to avoid running short in your first week of business.

7. Pre-Opening Checklist

The final two weeks before opening are when details are most likely to fall through the cracks, simply because too much is happening in parallel. Minimum checklist before opening day:

- All permits issued and posted where required by law

- Insurance active as of opening day, not the projected date

- All equipment installed and tested, including plumbing for pedicure chairs

- Signage installed and clearly visible from the street

- Google Business Profile set up with photos of the space and accurate hours

- Staff fully trained on sanitation and service procedures

- Enough consumable supplies for at least 30 days

The table below summarizes a realistic timeline for the full process, starting from lease signing:

Step process nail salon in the US
A realistic timeline for setting up a complete nail salon

The full setup process for a complete nail salon typically runs 3–5 months. Spaces with existing infrastructure tend to land at the shorter end, while a full build-out from shell space typically runs longer.

The nail salon is fully set up and ready to welcome customers

FAQ

How long does it take to set up a nail salon in the US from start to opening?

On average, 3–5 months from lease signing. A space with existing plumbing and ventilation typically shortens this to 2.5–3.5 months. Raw shell space requiring a full build-out typically runs 4–6 months, mainly due to permit and construction wait times.

Which step in the setup process most often causes delays?

Permit wait times and custom equipment lead times are the two most common causes. Filing permits early and ordering equipment as soon as the design is finalized, rather than waiting until construction is nearly done, significantly reduces delay risk.

Can permits and construction happen at the same time?

Yes, and they should. Filing permits in parallel with the design phase and early construction typically saves 3–6 weeks compared to handling each step sequentially.

Should I manage contractors myself or choose a turnkey setup?

Managing contractors individually can save money on paper but requires the owner to track progress and resolve issues between multiple parties. A turnkey setup costs 10–20% more but puts one vendor in charge of everything from design to handover, reducing the risk of construction and equipment falling out of sync.

What should I prepare before I start looking at spaces?

Have a clear salon model, target square footage, and total budget defined before touring spaces. Without these three numbers, it's easy to get pulled toward an attractive space that doesn't fit your financial plan or target clientele.

Conclusion

Setting up a nail salon in the US follows seven steps in a specific order, not a random checklist. Three things matter most for the process to go smoothly:

First, several steps should run in parallel, not sequentially. Permits, design, and equipment ordering can all move forward at the same time once the space is secured.

Second, design and equipment ordering need to happen together. Finalizing a design without ordering equipment right away is the most common reason a salon finishes construction but can't open on schedule.

Third, the final two weeks before opening shape the first impression clients form. A clear checklist prevents small details from slipping through, and those details directly affect the client experience from day one.

If you're planning a nail salon setup and want one partner from design through finished construction, Spencil can map out a realistic timeline based on your space and budget.

📞 888-995-0058

📍 535 Mission St, San Francisco, CA 94105

🌐 spencil.co

📩 facebook.com/spencilco

Interior Designers
Nail Salon Remodel in the US: Costs, Timing, and Process
October 22, 2025
All Items

Nail Salon Remodel in the US: Costs, Timing, and Process

Based on Spencil project data, nail salons that complete a well-executed remodel see average ticket increases of 18–22% and meaningfully better client retention. But a remodel done at the wrong scope — or the wrong time — can double the expected cost without delivering proportional results.

This guide answers three practical questions: does your salon actually need a remodel yet, should you renovate in place or build at a new location, and if you remodel, what does it realistically cost and take?

1. Signs Your Salon Needs a Remodel - And Signs It Doesn't

Not every aging salon needs a remodel. And not every salon with declining revenue will fix its problems by tearing things out and starting over.

Signs your salon genuinely needs a remodel:

- Revenue plateau despite consistent service quality: existing clients return, but you struggle to attract new ones. This often means the space no longer converts walk-ins against newer competitors in the area.

- Pedicure chairs and nail stations showing clear wear: compressed cushions, scratched surfaces, old plastic smell. Clients notice before they sit down and factor it into their review.

- Inefficient layout: technicians bumping into each other, confused client traffic, reception that can't manage the flow. Layout issues slow service speed and affect client experience, not just aesthetics.

- Ventilation problems: heavy chemical smell, client discomfort during service. Beyond the experience issue, this is a regulatory risk with OSHA and your State Board.

- 6–8 years without a meaningful upgrade: the typical commercial lifespan of nail salon furniture before replacement becomes necessary.

Signs you probably don't need a full remodel:

- Revenue decline caused by staffing or service consistency issues - a remodel won't fix operational problems

- Salon open less than 3 years where adding stations is sufficient - expansion, not renovation, may be the right answer

Nail salon remodel before and after in the US - Spencil renovation project comparison
Nail salon remodel in the US - Spencil renovation project comparison

2. Remodel vs. New Build: How to Choose

This is the question many salon owners skip and getting it wrong means either spending more than necessary or moving forward with a plan that won't solve the real problem.

Remodel in place when:

- Your current location performs well and your lease has significant time remaining

- The core infrastructure (electrical, plumbing, ventilation) is serviceable - you need aesthetic and functional upgrades, not a systems overhaul

- Existing clients are anchored to your address - relocating risks losing a portion of your current book

Build new at a new location when:-

- The current space is too small to add stations or expand the pedicure area meaningfully

- Infrastructure is too outdated - upgrading electrical, plumbing, and HVAC approaches or exceeds the cost of building new somewhere else

- The surrounding area has deteriorated - reduced foot traffic, demographic shifts away from your target client

The situation Spencil sees most often: owners planning a remodel who, after a proper audit, discover that bringing the technical systems up to standard accounts for 60–70% of the total budget. At that point, a new build in a better location typically delivers better ROI.

Nail salon remodel vs new build in the US - how to choose the right approach

3. Real Nail Salon Remodel Costs

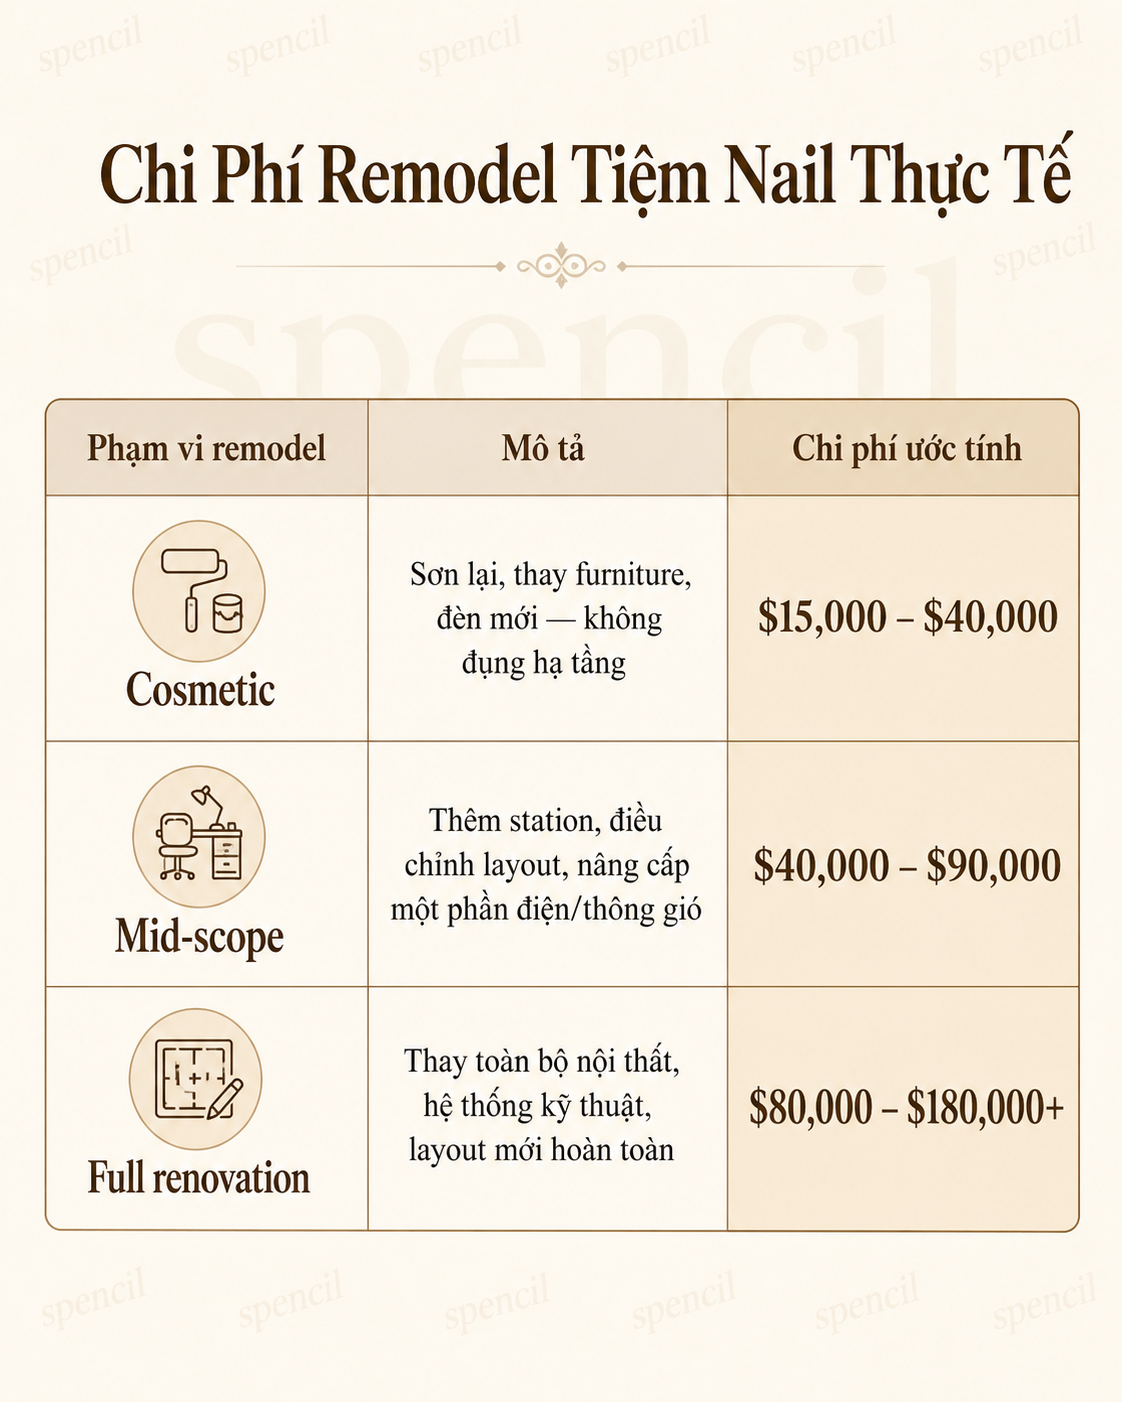
Cost depends on scope - not just square footage:

Important: These figures exclude downtime - revenue lost while the salon is closed or running at reduced capacity during construction. A salon generating $15,000/month that closes for three weeks loses approximately $11,000 in revenue. This is a real cost of remodeling that most budgets don't capture.

See also: complete nail salon interior package for a detailed cost breakdown of individual interior components.

Real Nail Salon Remodel Costs in Us

4. The Remodel Process Step by Step

Step 1 - Audit the existing space first

Assess actual conditions: does the electrical system have enough capacity, does plumbing need upgrading, what state is the HVAC in? This step defines the remodel scope and prevents expensive surprises after construction has started.

Step 2 - Define scope and budget

From the audit findings, confirm: cosmetic updates only, or infrastructure involvement? These two paths have completely different timelines and permit requirements.

Step 3 - Pull permits where required

Any changes to electrical, plumbing, or structure require a building permit from the county. Constructing without permits creates legal exposure and may result in a mandatory teardown and redo.

Step 4 - Choose the right construction window

January–February (after the holiday rush) and July–August (summer slowdown in many markets) are the lowest-impact windows for revenue. Avoid November–December, February (Valentine's), May (Mother's Day, prom), and any period within 4 weeks of your market's peak dates.

Step 5 - Phase construction where possible

For mid-scope remodels, some salons renovate by zone - complete the pedicure area first while keeping nail stations open, then rotate - to avoid total revenue loss. This requires coordinating with the contractor from the start to design a workable phase plan.

Step 6 - Reopen with a deliberate marketing push

A remodeled salon needs to be reintroduced. Before/after photos, social content, direct outreach to existing clients. Many owners skip this and end up with a significantly better space that their target clients haven't heard about yet.

5. Common Mistakes That Cost Owners More

Scheduling construction during peak season to "open in time"

The logic is to reopen for the holiday rush. The reality is that construction consistently runs late, and one week's delay in November can cost the entire Christmas season. The safer approach: construction in the off-season, reopening 3–4 weeks before the peak starts.

Cosmetic fixes applied to infrastructure problems

New paint and furniture won't fix weak ventilation or aging plumbing. The salon looks better, but the underlying issue remains and fixing it later is consistently more expensive than addressing it during the original remodel.

Not counting downtime as a remodel cost

A $50,000 remodel budget sounds manageable. But if the salon closes for four weeks and loses $20,000 in revenue, the true project cost is $70,000. Build downtime into the financial model from the start - it determines what scope is actually affordable.

Replicating the competitor that just opened nearby

Matching their design doesn't create a reason for clients to choose you over them - especially when they're newer. A remodel is the opportunity to build a distinct identity, not to catch up with someone else's.

Nail salon remodel before and after - Spencil interior renovation project in the US

FAQ

How much does a nail salon remodel cost in the US?

Cosmetic remodel (paint, furniture, lighting): $15,000–$40,000. Mid-scope with some layout and systems changes: $40,000–$90,000. Full renovation: $80,000–$180,000+. These figures don't include revenue lost during construction downtime.

How long does a nail salon remodel take?

Cosmetic: 1–3 weeks. Mid-scope: 3–6 weeks. Full renovation: 6–12 weeks. Actual timeline depends heavily on how fast the county processes permits and the condition of the existing space.

Do I need a permit to remodel my nail salon?

For furniture replacement and repainting - typically no. For any changes to electrical, plumbing, or structure - yes, a county building permit is required. Skipping permits creates legal risk and may require a mandatory teardown.

Should I tell clients before I close for a remodel?

Yes - and early. Notify existing clients before closing so they can plan. Post before/after content on social when you reopen, and run a short promotion for returning clients. This is the fastest way to recover revenue after the downtime period.

What's the best time of year to remodel a nail salon?

January–February or July–August are the best windows in most markets. Avoid November–December, February, and May - the periods when a construction delay would most damage annual revenue.

Conclusion

A nail salon remodel in the US is a real business investment - with a measurable ROI when done right, and real risk when done at the wrong scope or the wrong time. The signal to act usually arrives before the salon looks obviously tired: stalled revenue, difficulty attracting new clients, technicians working around a layout that slows them down.

Three things worth remembering from this guide:

-Audit infrastructure before locking in scope: cosmetic work on aging systems is money that won't compound

- Build downtime into the financial model: it's a real cost, not a footnote

- Construction timing determines revenue risk: off-season builds protect the annual number

If you're weighing remodel vs. relocation, or aren't sure what scope makes sense for your current space and budget, Spencil can give you an honest initial assessment before you need to commit to anything.

📞 888-995-0058

📍 535 Mission St, San Francisco, CA 94105

🌐 spencil.co

📩 facebook.com/spencilco

Interior Designers
Salon
Spa
Điều Gì Sẽ Xảy Ra Nếu Bạn Thay Đổi Mẫu Nội Thất Tiệm Nail Cũ?
October 20, 2025
All Items

Khám phá những thay đổi bất ngờ khi làm mới mẫu nội thất tiệm nail – từ ánh sáng, màu sắc đến bố cục và cách thiết kế mới tác động mạnh mẽ đến cảm xúc khách hàng.

Có bao giờ bạn bước vào một tiệm nail mà cảm giác muốn rời đi sớm xuất hiện chỉ sau vài phút? Không phải do dịch vụ, mà là vì không gian cũ kỹ, ánh sáng sai, màu sắc lạc tông khiến tâm trạng chùng xuống.

Thật ra, mẫu nội thất tiệm nail không chỉ là phần trang trí mà là yếu tố vô hình điều khiển cảm xúc, thời gian và hành vi của khách hàng.

1. Ánh Sáng Trong Mẫu Nội Thất Tiệm Nail

Ánh sáng là linh hồn của mọi không gian làm đẹp. Một mẫu nội thất tiệm nail với ánh sáng sai có thể khiến khách thấy khó chịu, còn ánh sáng đúng lại mang đến cảm giác thư giãn và sang trọng.Bố trí ánh sáng theo từng lớp chính, điểm và trang trí giúp không gian có chiều sâu, đồng thời tôn lên đường nét nội thất.‍

Ánh sáng vàng ấm trong tiệm nail tạo cảm giác thư giãn

2. Màu Sắc Tiệm Nail – Tác Động Đến Cảm Xúc Khách Hàng

Màu sắc không chỉ làm đẹp mà còn ảnh hưởng mạnh đến tâm trạng. Một mẫu nội thất tiệm nail tone pastel hoặc beige – gold sẽ khiến khách cảm thấy nhẹ nhàng, tin tưởng và thư thái hơn hẳn những tông lạnh hoặc đối lập mạnh.

Chỉ cần thay màu tường hoặc chất liệu ghế, bạn có thể thay đổi hoàn toàn cảm nhận của khách khi bước vào.

Không gian tiệm nail tone pastel với ghế trắng và ánh sáng dịu

3. Bố Cục Mẫu Nội Thất Tiệm Nail – Tạo Trải Nghiệm

Bố cục là bản đồ cảm xúc của không gian. Một mẫu nội thất tiệm nail được bố trí khoa học giúp khách dễ di chuyển, dễ chọn dịch vụ và cảm thấy thoải mái khi ngồi chờ. Không gian mở, có điểm nhấn trung tâm như quầy polish rack hay logo thương hiệu giúp khách ghi nhớ tiệm lâu hơn.

Bố cục tiệm nail mở, ghế manicure và polish rack sắp xếp gọn gàng

4. Mẫu Nội Thất Tiệm Nail Mới, Cảm Xúc Cũng Được Làm Mới

Thay đổi mẫu nội thất tiệm nail không chỉ là làm đẹp mà là nâng cấp năng lượng. Không gian mới khơi nguồn cảm hứng cho nhân viên và mang lại cảm giác tích cực cho khách. Kết quả là doanh thu, review tốt và tần suất khách quay lại đều tăng, đơn giản vì mọi người thích cảm giác ở trong không gian đó.

Không gian mẫu nội thất tiệm nail với tông màu hiện đại, tinh tế

5. Mẫu Nội Thất Tiệm Nail Mới – Chìa Khóa Cho Cảm Xúc Và Doanh Thu

Một mẫu nội thất tiệm nail được thiết kế khéo léo là cầu nối giữa thẩm mỹ và trải nghiệm. Khi ánh sáng, màu sắc và bố cục được sắp đặt đúng, bạn không chỉ tạo ra không gian đẹp mà còn tạo nên trải nghiệm khiến khách nhớ mãi.

Đã đến lúc để Spencil giúp bạn làm mới không gian – biến tiệm nail thành nơi khách ghé rồi ghiền, chạm cảm xúc ngay từ ánh nhìn đầu tiên.‍‍

Interior Designers
Salon
Spa
Mẫu Nội Thất Salon Đẹp Có Thật Sự Quan Trọng Hơn Tay Nghề?
October 20, 2025
All Items

Khách quay lại salon vì không gian hay vì tay nghề? Cùng khám phá sự thật phía sau những mẫu nội thất salon sang trọng và trải nghiệm thật sự khiến khách trung thành.

Mẫu Nội Thất Salon Đẹp Có Quan Trọng Hơn Tay Nghề?

Một câu hỏi “chạm tự ái” không ít chủ salon: Nếu tay nghề tốt mà không gian bình thường – khách có quay lại không? Hay chỉ cần không gian đẹp, khách sẽ bỏ qua mọi thiếu sót kỹ thuật?

Thực tế cho thấy: mẫu nội thất salon không chỉ là yếu tố thẩm mỹ, mà còn là cảm xúc đầu tiên – thứ khiến khách quyết định ở lại hay bước đi.

Không gian salon tone hiện đại, ánh sáng dịu và nội thất sang trọng

1. Mẫu Nội Thất Salon Cảm Xúc Quyết Định Hành Vi

Nhiều nghiên cứu chỉ ra rằng, ấn tượng đầu tiên hình thành trong 3 giây đầu tiên. Một mẫu nội thất salon được thiết kế hài hòa về ánh sáng, màu sắc và bố cục sẽ tạo cảm giác tin tưởng, chuyên nghiệp – điều mà tay nghề giỏi khó thể hiện ngay tức thì.

Khách đến làm đẹp không chỉ vì kết quả, mà còn vì cảm xúc trong suốt quá trình trải nghiệm. Khi ánh sáng, mùi hương và âm thanh hòa quyện, họ thư giãn hơn, mở lòng hơn và sẵn sàng chi tiêu nhiều hơn.

Một không gian đẹp chính là “lời chào” đầu tiên, trước khi cây kéo hay cọ chạm vào khách.

2. Tay Nghề Mới Là Thứ Giữ Chân Khách

Tuy nhiên, đừng để vẻ ngoài lấn át giá trị cốt lõi. Một mẫu nội thất salon sang trọng chỉ là cửa ngõ dẫn khách đến, nhưng chất lượng phục vụ mới là yếu tố khiến họ quay lại.

“Tôi từng đến một salon rất sang, nhưng tóc bị hư sau khi uốn – và tôi không bao giờ quay lại.” – chia sẻ của một khách hàng trung niên tại California.

Không gian tạo ra sự háo hức, nhưng tay nghề và thái độ phục vụ mới nuôi dưỡng niềm tin. Một salon thành công không phải nơi chỉ đẹp để nhìn, mà là nơi đáng để trở lại.

Salon hiện đại, ánh sáng tự nhiên, tạo cảm giác chuyên nghiệp

3. Kết Hợp Mẫu Nội Thất Salon Và Tay Nghề – Bí Quyết Thành Công Thực Sự

Cuộc tranh luận “đẹp hay giỏi quan trọng hơn” không cần người thắng kẻ thua. Một salon bền vững là nơi mẫu nội thất salon đẹp và tay nghề bổ trợ cho nhau.

Không gian đẹp giúp khách ở lại lâu hơn, tạo trải nghiệm cao cấp. Tay nghề tốt biến trải nghiệm ấy thành cảm xúc khiến khách kể lại.

Sự kết hợp giữa nghệ thuật thiết kế và kỹ năng phục vụ chính là chìa khóa thương hiệu lâu dài – nơi mỗi chi tiết đều có linh hồn.

Kết Luận:

Mẫu Nội Thất Salon Có Giá Trị Khi Phục Vụ Cảm Xúc

Một mẫu nội thất salon đẹp có thể khiến khách bước vào, nhưng tay nghề mới khiến họ ở lại. Đẹp giúp bạn được chú ý – giỏi giúp bạn được nhớ.

Chỉ khi cả hai hòa quyện, salon mới thật sự trở thành thương hiệu có cảm xúc và sức sống.

Bạn nghĩ sao? Nếu phải chọn giữa “tay nghề xuất sắc” và “không gian đẳng cấp”, bạn chọn điều gì trước?

Hãy để lại bình luận – vì câu trả lời của bạn có thể thay đổi góc nhìn của nhiều chủ salon khác ở Mỹ.

Interior Designers
Salon
Spa
Bạn Muốn Spa Thành Công? Hãy Bắt Đầu Từ Thiết Kế 3D
October 20, 2025
All Items

Giải mã lý do đằng sau thành công của những spa hàng đầu – tất cả đều bắt đầu với thiết kế 3D spa chuyên nghiệp. Bước đầu nhỏ, kết quả lớn!

Nhiều chủ spa nghĩ rằng thành công đến từ tay nghề, dịch vụ hoặc cách marketing. Điều đó đúng nhưng chưa đủ. Thực tế, ấn tượng đầu tiên của khách hàng không đến từ kỹ thuật, mà từ không gian.

1. Thiết Kế 3D Spa – Thấy Trước Thành Công Của Bạn

Thay vì tưởng tượng mơ hồ, bản thiết kế 3D spa giúp bạn nhìn thấy toàn cảnh không gian ngay từ khi bắt đầu: bố cục, ánh sáng, chất liệu, lối đi và cảm giác tổng thể.
Đây là bước nhìn trước tương lai, tránh lãng phí chi phí, thời gian và sai sót thi công.

“Tôi từng nghĩ thuê thiết kế là tốn kém, nhưng đến khi sửa sai 2 lần mới thấy, bản 3D rẻ hơn gấp nhiều lần.” – chia sẻ từ một chủ spa tại California.

Một bản vẽ 3D chi tiết còn giúp bạn thử nghiệm tone màu thương hiệu, ánh sáng và phong cách (modern, luxury, organic…) mà không cần đập phá thật.

Phối cảnh thiết kế 3D spa hiện đại với tone hồng và đèn trần ánh vàng

2. Không Gian Spa Trở Thành Thông Điệp Thương Hiệu

Một spa đẹp không chỉ nhờ nội thất đắt tiền mà ở cách không gian biết “nói hộ” chủ nhân của nó.

Ánh sáng mềm, hương tinh dầu thoang thoảng, tiếng nhạc nhẹ nhàng... tất cả hòa lại thành bản giao hưởng của cảm xúc.

Với thiết kế 3D spa, bạn không cần phải tưởng tượng. Bạn được “đi dạo” trong chính không gian tương lai của mình, nơi mỗi chi tiết đều kể một câu chuyện: về sự chăm

sóc, tinh tế và tôn trọng khách hàng.

Khi khách bước vào, họ không chỉ thấy một spa, họ cảm nhận được bạn là ai.

Một bức tường cong mềm mại, một góc sofa ấm, hay ánh sáng dịu nơi phòng trị liệu… tất cả trở thành dấu ấn thương hiệu – thứ khiến khách nhớ mãi và sẵn sàng quay lại.

3. Thiết Kế 3D – Đầu Tư Một Lần, Sinh Lợi Lâu Dài

Nhiều người nghĩ thiết kế 3D chỉ để xem cho đẹp, nhưng thực tế, đó là bản kế hoạch thông minh nhất bạn có thể đầu tư.

Mọi thứ từ màu sơn, ánh sáng đến vật liệu đều được tính toán chính xác trước khi thi công, giúp bạn kiểm soát rủi ro, ngân sách và tiến độ ngay từ đầu.

Một bản vẽ rõ ràng giúp bạn tránh hàng chục quyết định sai và tiết kiệm hàng nghìn đô.

Không gian được dựng 3D chuẩn chỉnh cũng giúp thợ thi công nhìn thấy đích đến rõ ràng hơn, hạn chế chỉnh sửa, tiết kiệm đến 30% chi phí thực tế.

Và khi mọi thứ vận hành trơn tru, bạn không chỉ tiết kiệm tiền mà còn tạo ra giá trị cảm xúc bền vững cho khách hàng.

Bản thiết kế 3D spa hiển thị chi tiết ánh sáng, bố cục và chất liệu nội thất

Kết Luận:

Không gian không chỉ là nơi diễn ra dịch vụ mà là phần mở đầu cho trải nghiệm cảm xúc của khách hàng.

Một bản thiết kế 3D spa là cầu nối giữa ý tưởng và hiện thực, giữa cảm hứng và lợi nhuận.

Vì thế, nếu bạn muốn đi xa hơn, đừng chỉ đầu tư vào dịch vụ, hãy đầu tư vào cảm giác mà không gian mang lại.

Hãy để Spencil đồng hành cùng bạn biến bản vẽ 3D thành hành trình “thức tỉnh không gian”, giúp spa của bạn không chỉ đẹp, mà còn đáng nhớ trong lòng mỗi vị khách.

No items found.